- Sea Ray
- Sea Ray Boats
- Cabin Cruisers
- 2006 340 DA- Can anyone share advice...
- Subscribe to RSS Feed
- Mark Topic as New
- Mark Topic as Read
- Float this Topic for Current User
- Bookmark
- Subscribe
- Mute
- Printer Friendly Page
2006 340 DA- Can anyone share advice...
- Mark as New
- Bookmark
- Subscribe
- Mute
- Subscribe to RSS Feed
- Permalink
- Report Inappropriate Content
11-24-2021 04:43 PM
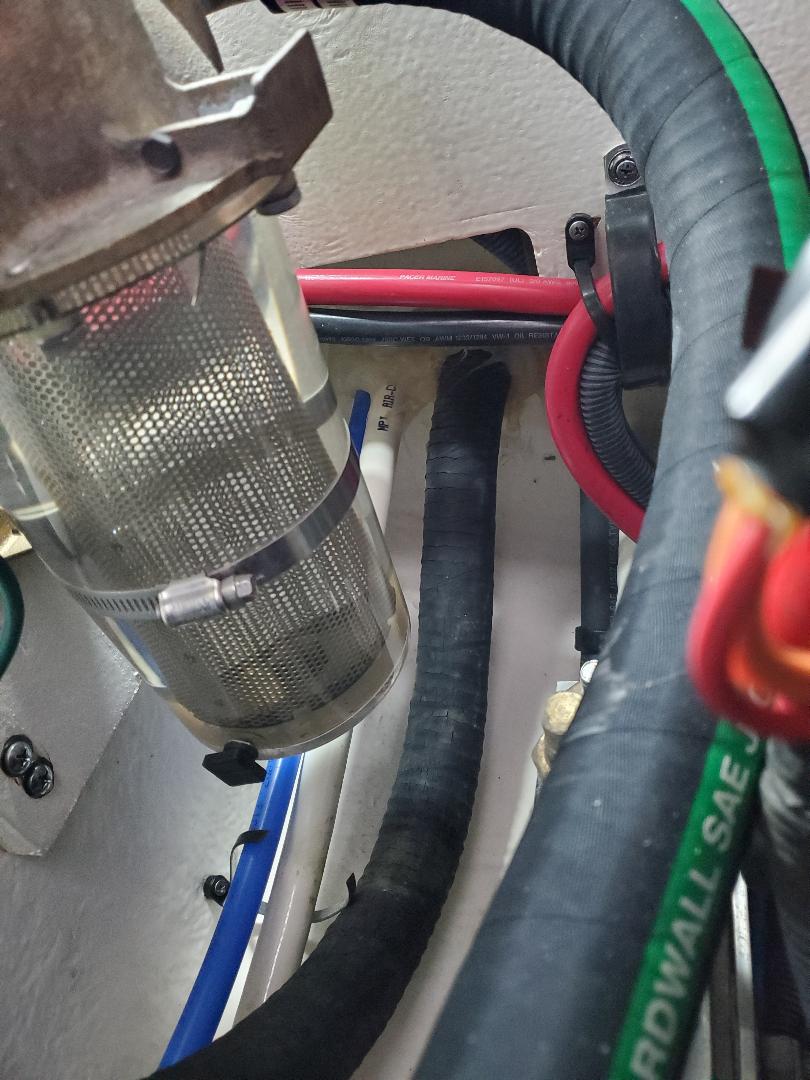
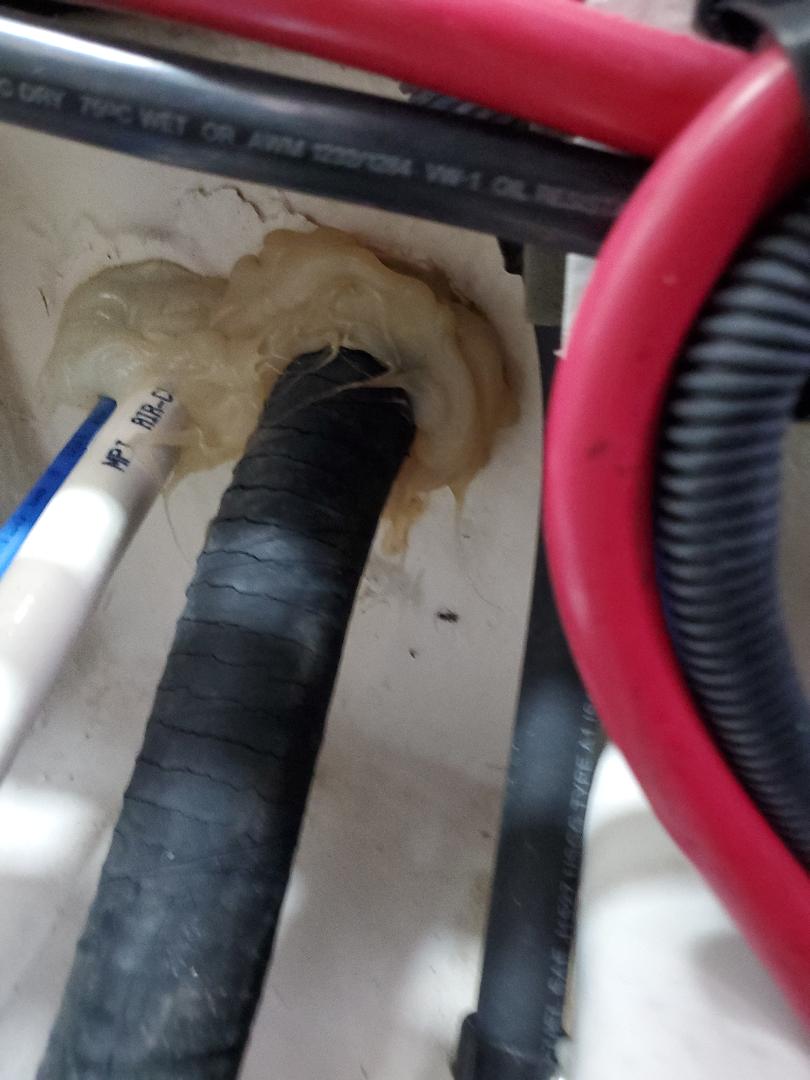
2006 340 DA- Can anyone share advice on replacement of the 1.5" vacuum discharge hose from toilet to vac generator? The original hose is dry rotted and not holding vacuum. I have removed 96% of the glob of silicon from the hose on the cabin side of aft bulkhead. Still can't get hose to move. If the aft side of bulkhead to hose has same massive sealant I'm in trouble with a lack of access. My plan is to free up the hose and attach a barbed coupling to pull a new hose thru obstacles. Advice is greatly appreciated! Thanks
- Mark as New
- Bookmark
- Subscribe
- Mute
- Subscribe to RSS Feed
- Permalink
- Report Inappropriate Content
11-24-2021 09:12 PM
The waste hose on my 2000 380DA appears to have appropriate access across the length and appears to be constructed from two joined 10' pieces, with access to those hose clamps at the joint.
Remember that they had sufficient access when building the boat, so that must be currently available.
As an example. it would be impossible to apply sealant to an area w/o access.
That hose should be sufficiently stiff to poke into the region, permitting it to be grabbed and connected.
On my boat the engine room near the waste tank has a vertical wall w/ a long wedge shaped volume, with this wall on one side, the hull on the other side and the deck on the top. That wall has a large cutout at the top to permit access to the volume interior.
My recollection is that the waste hose is routed through Schedule 40 PVC pipe glassed to the bottom of this volume, poking through the salon wall behind the 'fridge. I also recall lots of goop where the waste hose pokes through this wall.
- Mark as New
- Bookmark
- Subscribe
- Mute
- Subscribe to RSS Feed
- Permalink
- Report Inappropriate Content
11-25-2021 05:17 AM
For some reason Sea Ray used goop instead of fiberglass to seal the pipe to the engine room / cockpit wall. That goop is on the pipe, not on the waste hose.
https://live.staticflickr.com/65535/51704609789_343fb84036_c.jpg
- Mark as New
- Bookmark
- Subscribe
- Mute
- Subscribe to RSS Feed
- Permalink
- Report Inappropriate Content
11-25-2021 05:20 AM
In my case, this also shows an additional Schedule 40 pipe that is almost ready to be fiberglassed to that wall, for additional cables that will be run through that wall.
https://live.staticflickr.com/65535/51703932966_aa9705afe5_c.jpg
- Mark as New
- Bookmark
- Subscribe
- Mute
- Subscribe to RSS Feed
- Permalink
- Report Inappropriate Content
11-25-2021 09:02 AM
- Mark as New
- Bookmark
- Subscribe
- Mute
- Subscribe to RSS Feed
- Permalink
- Report Inappropriate Content
11-25-2021 09:03 AM
- Mark as New
- Bookmark
- Subscribe
- Mute
- Subscribe to RSS Feed
- Permalink
- Report Inappropriate Content
11-25-2021 09:07 AM
- Mark as New
- Bookmark
- Subscribe
- Mute
- Subscribe to RSS Feed
- Permalink
- Report Inappropriate Content
11-25-2021 09:08 AM
- Mark as New
- Bookmark
- Subscribe
- Mute
- Subscribe to RSS Feed
- Permalink
- Report Inappropriate Content
11-25-2021 03:43 PM
It looks like removing / replacing the goop at each location may be difficult but still possible to perform.
The Engine Room side looks like access would be improved by first removing the raw water strainer.
The others appear to have normal access.
IMO I would avoid adding an additional splice. There should be one already, to permit using standard 10' sections. I would replicate that on the replacement.
- Mark as New
- Bookmark
- Subscribe
- Mute
- Subscribe to RSS Feed
- Permalink
- Report Inappropriate Content
11-25-2021 05:01 PM
- Mark as New
- Bookmark
- Subscribe
- Mute
- Subscribe to RSS Feed
- Permalink
- Report Inappropriate Content
11-26-2021 08:32 AM
https://forum.toolsinaction.com/topic/14455-wingless-dcs355d1-20v-max-xr-omt-oscillating-saw-kit/#comment-201419
https://farm8.staticflickr.com/7855/45648031495_f8f7ec12ab_b.jpg
It would surprise me if cable ties instead of worm drive stainless hose clamps are used on that waste hose.
- Mark as New
- Bookmark
- Subscribe
- Mute
- Subscribe to RSS Feed
- Permalink
- Report Inappropriate Content
11-26-2021 06:47 PM
- Mark as New
- Bookmark
- Subscribe
- Mute
- Subscribe to RSS Feed
- Permalink
- Report Inappropriate Content
11-26-2021 06:58 PM
- Mark as New
- Bookmark
- Subscribe
- Mute
- Subscribe to RSS Feed
- Permalink
- Report Inappropriate Content
11-26-2021 08:05 PM
- Mark as New
- Bookmark
- Subscribe
- Mute
- Subscribe to RSS Feed
- Permalink
- Report Inappropriate Content
11-26-2021 08:19 PM
- Mark as New
- Bookmark
- Subscribe
- Mute
- Subscribe to RSS Feed
- Permalink
- Report Inappropriate Content
11-27-2021 04:12 AM
There are other examples were the factory shows that they are investors in the sealant companies. The hydraulic trim tab tubes are surrounded by pyramid sealant piles for the above waterline transom protrusions.
On my boat they could have glassed in the end of that Schedule 40 pipe (containing this waste hose), like they did along the length, but instead used a massive amount of goop to seal this rigid pipe at the wall penetration, shown in a prior image link.


